Our Most Frequently Asked Questions
If you don’t find what you’re looking for here, please call us toll-free at 1-877-283-0697 or email us at mcustomer@melnor.com.

If you don’t find what you’re looking for here, please call us toll-free at 1-877-283-0697 or email us at mcustomer@melnor.com.
Submit your warranty claim here. Melnor® stands behind its products. If you experience an issue between the date of purchase and the warranty date listed on the packaging, please fill out and submit the warranty claim form. A member of our customer service team will respond to your request. We strive to provide all claims with a quick and easy resolution to get you back in the garden.
Our products are sold by industry-leading distributors and retailers primarily throughout the United States and Canada. Click here to find a retailer near you.
Our customer service hours are Monday – Friday, 8:00 am – 4:30 pm ET. We strive to provide all questions with a quick and easy resolution to get you back in the garden.
We are headquartered in Virginia’s Shenandoah Valley, located in Winchester, Virginia.
You should clean your products periodically. Debris or sediments commonly found in water can build up in your product. Freezing temperatures can cause water in the product to freeze and expand, damaging the product. At the end of the season or when there is frost in the forecast, store your product indoors, away from freezing temperatures.
Our products work best with a minimum of 20 PSI and a maximum of 80 PSI.
Melnor Hose End Products are designed to be left out in the elements and do not need to be covered during the spring, summer, and fall gardening season. We recommend winter storage for all our products. Freezing temperatures can cause water in the product to freeze and expand, damaging the product. At the end of the season or when there is frost in the forecast, store your product indoors, away from freezing temperatures. Our waters timers need to be removed from the spigot, drained, and stored at temperatures above freezing with the battery removed.
The thread standard for garden hose connectors in the United States and its territories are known as “garden hose thread” (GHT), which is 3/4″ diameter straight (non-tapered) thread with a pitch of 11.5 TPI (male part has an outer diameter of 11⁄16 inches (26.99 mm)). This fitting is used with 1/2″, 5/8″, and 3/4″ hoses. Outside the United States, the more common British standard Pipe threads (BSP) standard is used, which is 3/4″ and 14 TPI (male part OD is 26.441 mm or 1.04 in). The GHT and BSP standards are not fully compatible but may interconnect in a rough manner, relying on the internal gasket to prevent leaks.
Programming a Melnor water timer is easy. Each watering area can have its own schedule. Follow along on our YouTube channel or find the Melnor water timer manuals here. As always, contact us with any questions and we’ll be happy to walk you through it.
To reset the Melnor Bluetooth Water Timer, remove the batteries from the valve unit. Re-insert the batteries while holding down the button on valve 1. Continue holding down the button until you see the battery light come back on. You may need to re-start your phone or smart device. See Melnor Bluetooth Water Timer instructions for more information.
To erase all settings and reset your Melnor Electronic Water Timer, simply press and hold the middle button on the water timer for about 7 seconds. The screen will display RESET.
Please note: All programming will be lost when the timer is RESET. After RESET, you may need to change the time setting between 12-hour (AM/PM) and 24-hour (military time). See Melnor water timer instructions for more information.
Yes, you can. On your Melnor Hydrologic® Water Timer, go to the “START WATER” option on the navigation screen. Set the “START TIME” for the cycles you would like to discontinue to “—“. This time is located between 11:59pm and 12am. This will end any cycles you wish to cancel without resetting the full zone.
See Melnor water timer instructions for more information.
Our products work best with a minimum of 20 PSI and a maximum of 80 PSI. The following table provides average GPM guidelines for various water pressures. Exact GPMs can only be determined on-site using the actual water source.
Water Pressure (PSI) / Water Output (GPM)
30 PSI / 7 GPM
50 PSI / 9.5 GPM
70 PSI / 12 GPM
90 PSI / 15 GPM
For optimal performance, we recommend using Duracell or Energizer batteries. Only 1.5 Volt alkaline batteries should be used in Melnor water timers. Rechargeable batteries will not provide optimal performance and may cause timers to fail.
On average, the batteries should last the equivalent of one watering season. We recommend that new batteries be used when the timer is installed each spring. Battery life may fluctuate depending on the brand. For optimal performance, we recommend using Duracell or Energizer batteries. Only 1.5 Volt alkaline batteries should be used in Melnor water timers. Rechargeable batteries will not provide optimal performance and may cause timers to fail.
To change the battery in a Melnor water timer, start by removing the battery holder from the back of the timer and inserting the batteries as indicated. If you’re unable to remove it with your hand, you may want to try something such as a pliers or screwdriver. Then, replace the battery holder. Only 1.5 Volt alkaline batteries should be used in Melnor water timers. Do not use rechargeable batteries. We recommend replacing batteries when the indicator flashes a red light, or the battery icon shows low. See Melnor water timer instructions for more information.
There is a possibility the batteries are not installed correctly. You can check this by looking at the diagram on the bottom of the battery housing. If they are installed incorrectly, the display will not come on.
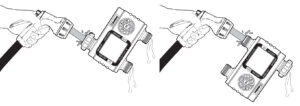
You should clean your water timer periodically. Debris or sediments commonly found in water can build up in your timer. Turn off the water. Remove the timer from the faucet and check that the filter washer is clear. If you notice any debris, remove the filter washer, and clean it out with water. Activate the MANUAL mode. Open the valves and spray water through the valves and the faucet connection to flush out any built-up sediments or debris.
Freezing temperatures can cause water in the timer to freeze and expand, damaging the timer. At the end of the season or when there is frost in the forecast, turn off the water and remove your timer from the faucet. Remove the batteries. Be sure to store the timer indoors, away from freezing temperatures.
The desert climate is rough on electronics. Since we do not know the exact conditions, it is hard to predict if the timer will work or what effect the conditions will have on the life of the timer. We can tell you how the timers are tested. The timers are tested through an accelerated UV test – 1 hour of sunlight at 63 degrees Celsius (145 Fahrenheit) / 18 minutes at 63 degrees Celsius with moisture and 30 minutes of darkness. The timers go through 120 hours of accelerated testing before the item is approved for production.
Try these steps to reset the valves:
Step 1: Turn the water off at the spigot.
Step 2: Move the arrow on the timer to the OFF position.
Step 3: Press the On/Off Manual button, press the Zone button, choose the problem valve, hit the + (plus) button, and put 1 min on it.
Step 4: You’ll see a watering faucet animation. Wait for the full minute to elapse.
Step 5: Repeat the process for any other valves with the same problem.
Step 6: Slowly turn the faucet back on.
Step 7: Press the On/Off Manual button, put 1 minute on it and choose a zone to make sure water is now coming from the problem zone or zones.
If rain is in the forecast, you can temporarily suspend your watering program using the RAIN DELAY feature. RAIN DELAY stops the next cycle from running for your choice of hours. After the selected delay has ended, your watering program will automatically resume.
For example, say your water timer is programmed to come on every 12 hours with a start time of 10 AM on Monday.
Suppose the RAIN DELAY feature is turned on at 11 AM on Tuesday for two days. The timer will skip 48 hours and come back to run its next cycle at 10 PM on Thursday, not 10 AM Thursday morning, and it will resume the regular watering program.
We offer 1-zone, 2-zone, and 4-zone water timers. Each zone allows you to water different areas of your yard from the same faucet. Each valve works like a separate water timer with different start times.
The end plug can be removed to flush out the oscillating sprinkler to avoid any debris or mineral buildup that could shorten the life of the sprinkler. This is recommended regularly so your oscillating sprinkler will continue to function effectively. It also has a dual purpose of having a thin plastic probe on the inside to keep the nozzles clear of any debris or mineral buildup. Click here for cleaning instructions.

Please contact our customer service team. They will be happy to assist you in getting the missing piece.
Some Melnor sprinklers do allow for unit-to-unit connection. In general, the oscillating sprinklers do not have this option, but most pulsating and rotary sprinklers do. Please remember that your water pressure will determine how efficiently the unit-to-unit connection will be and the first few units will get the pressure whereas the units that follow will get what is left. The unit-to-unit connection couplings are standard garden hose threads and sprinklers should be connected using a regular garden hose. Our Garden Watering Kit and Multi-Adjustable Sprinkler are most suited to unit-to-unit connections because they work well with lower water pressure.